
You’re new to the whole camping game, and you’ve heard about using tarps for tents but aren’t sure which one to use when, how to make a tarp tent, or if you even need one…
There are so many types of shelters you can make with a tarp, and it can be quite overwhelming to figure out which ones are best. Some tarp structures are easy to put up, some are ideal for camping in, and some would leave you drenched in a downpour.
Tarps tents are versatile and essential for campers. Check out our tarp shelter ideas and find out how to make a tarp tent!
Tarp tent designs and when to use them
| Tarp design | Ease of set up | Weatherproofing | Versatility | Best for | Overall rating |
| A-Frame | 5/5 | 5/5 | 5/5 | Sleeping | 5/5 |
| Plough Point | 5/5 | 5/5 | 4/5 | Sleeping | 4.7/5 |
| Body Bag | 4/5 | 5/5 | 4/5 | Sleeping | 4.3/5 |
| Square Arch | 5/5 | 3/5 | 5/5 | Sleeping | 4.3/5 |
| Ridgeline lean-to | 5/5 | 3/5 | 4/5 | Sleeping & Shelter | 4/5 |
| Lean-to | 5/5 | 3/5 | 4/5 | Shelter | 4/5 |
| Dining Fly | 3/5 | 4/5 | 5/5 | Dining | 4/5 |
| Flat Roof Lean-to | 3/5 | 3/5 | 5/5 | Shelter | 3.7/5 |
| Fly line Roof | 3/5 | 2/5 | 5/5 | Shelter for gear | 3.3/5 |
| Fly poles | 3/5 | 2/5 | 3/5 | Dining | 2.7/5 |
The famous A-frame tarp tent is the easiest and most versatile tarp tent that you can use. It’s easy to make with just one person, excellent in all kinds of weather, and in our opinion, it is the most useful and easiest one for beginners to tackle.
Related: If you’re wanting a big tent for a group but tarp tents aren’t your thing, check out our list of the best 3 room tents.
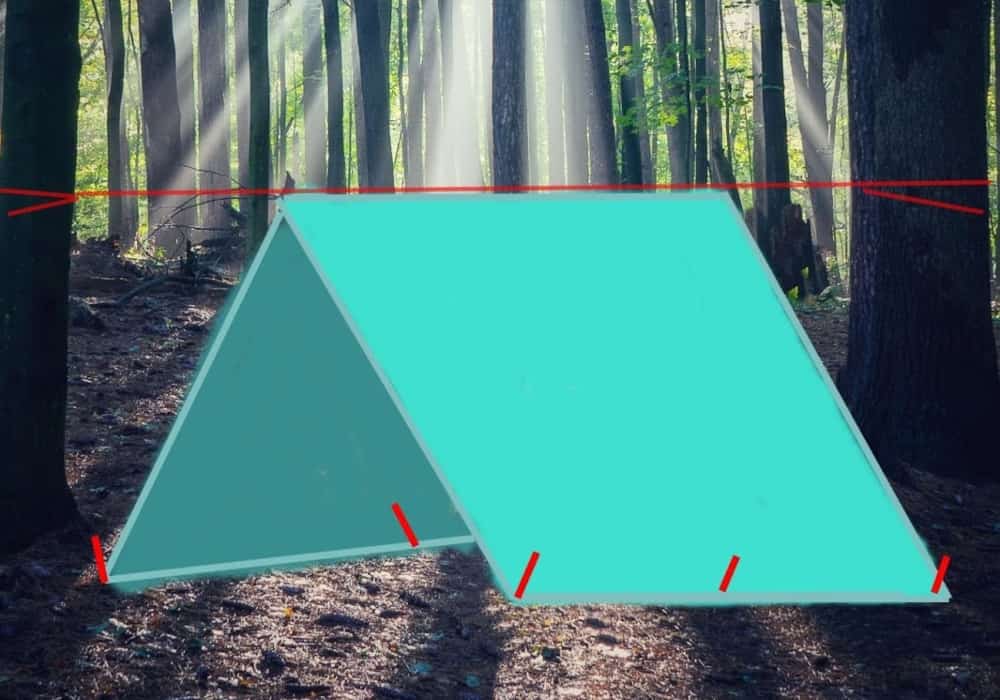
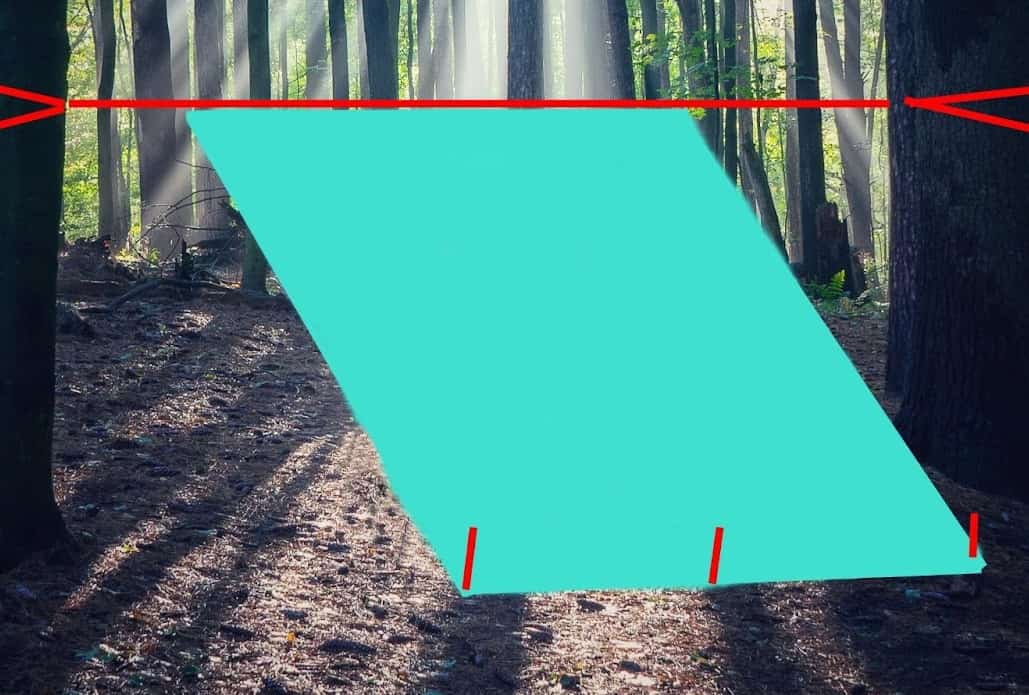
1. A-Frame Sleeping Shelter
The easiest sleeping shelter requires two trees about 10 foot/3m apart with soft enough ground for sleeping.
Fasten the guy rope around the trees so that there is no slack, then throw the tarp over lengthways and secure the sides with your stakes or tent pegs.
Pros:
- Quick to set up and pull down
- Needs only one person to set up
- Angles allow good run off of both snow and rain
Cons:
- Make sure the fly line is tight to avoid sagging
- No groundsheet
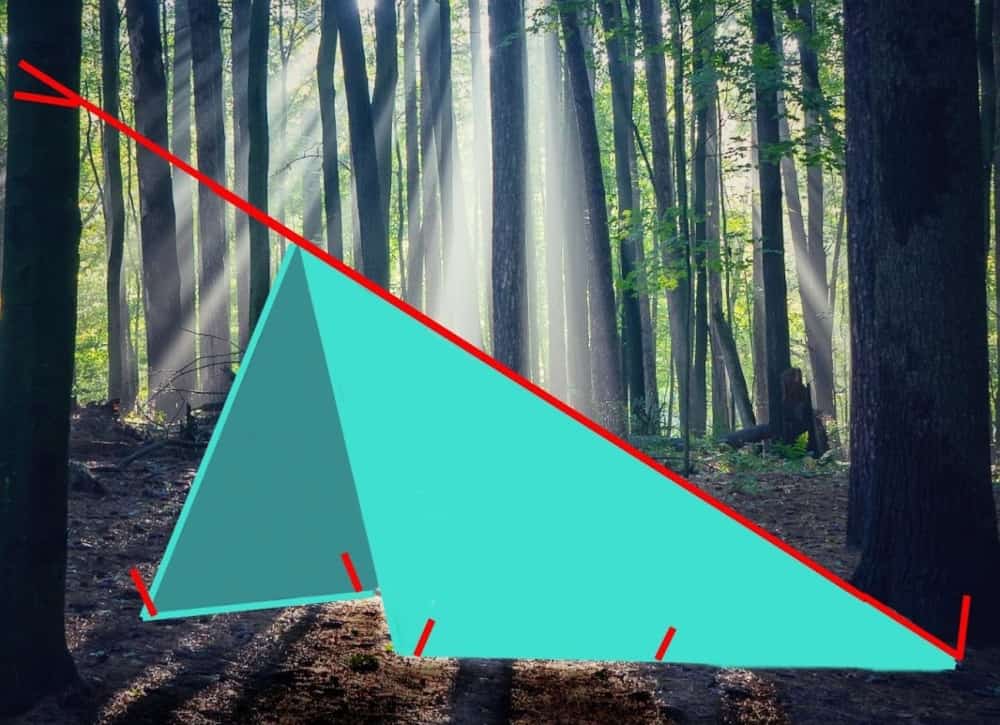
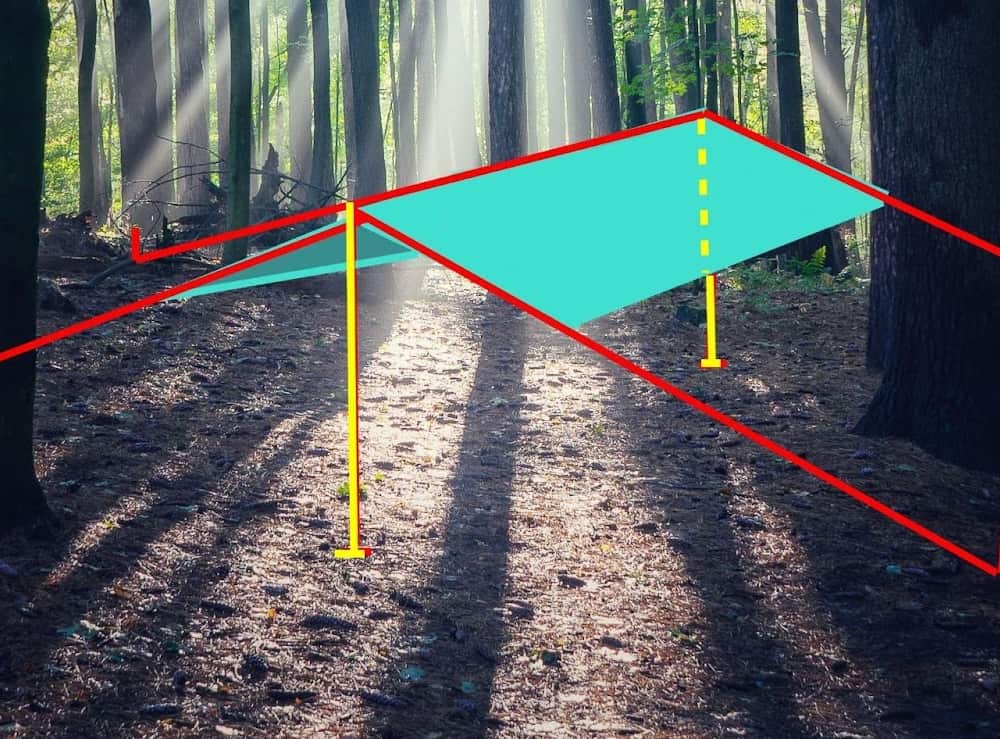
2. Plough Point tarp tent
The Plough Point is a great little sleeping structure that requires only one fly line and one tree.
Tie the fly line around a tree and stake the end of it securely about 10 feet or 3m away on the ground at about a 30-degree angle.
Place the tarp over the line on a diagonal and secure all the edges with stakes or tent pegs.
Pros:
- Only needs one tree
- Good shelter from sun, wind, and rain.
Cons:
- No floor
- Protection only from one side

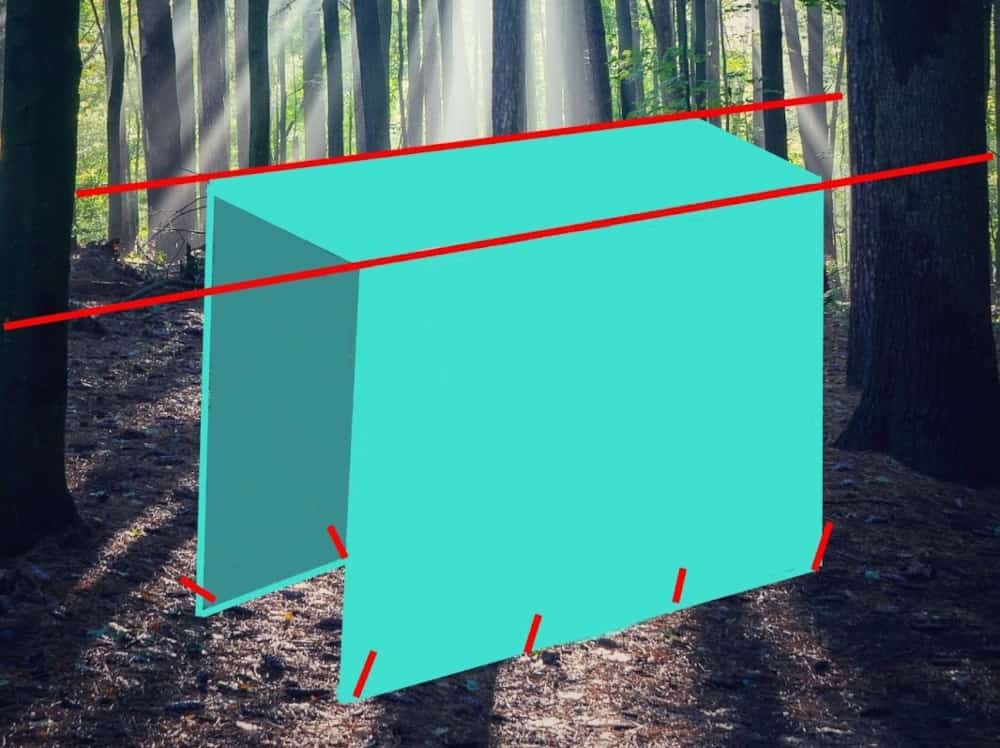
3. Body Bag sleeping structure
This one is great if you need a little bit of ground protection for sleeping.
You’ll need two trees about 10 feet or 3m apart to tie the fly rope between. It needs to be at a height to fold the tarp into thirds to create a floor.
Use the stake or tent pegs to hold the slides out and the floor straight.
Pros:
- Good protection from wind, rain, and snow
- Ground Cover
Cons:
- Only room for one person inside
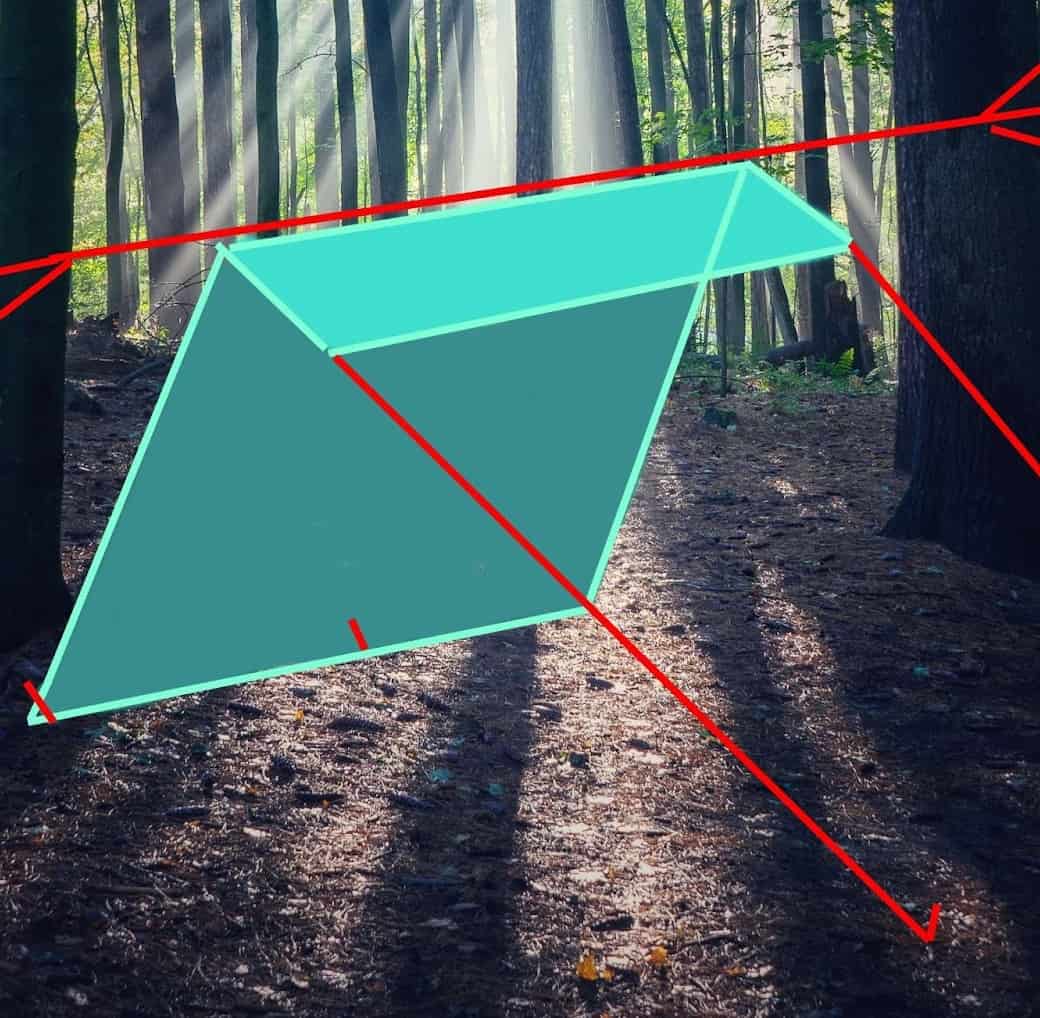
4. Square Arch tarpaulin tent
A good sleeping structure if you need a bit of headroom.
You’ll need two large trees about 10 feet or 3m apart but wide enough to give you the width you need to sleep. Drape the tarp over the parallel lines and secure the tarp base with your tent pegs. If your trees aren’t wide enough, try placing a series of sticks or walking poles across the lines to widen the tarp.
Pros:
- Good shelter from the sun and rain
- Works well with mosquito nets
Cons:
- Water can puddle in the center
- Can be hard to find suitable trees to do this with
5. Ridge-line lean-to tarp shelter
The Ridgeline lean-to provides shade and wind protection for storing gear and sleeping under.
Tie off your fly line between two trees about 10 feet or 3m apart. Fold a quarter of the tarp over the line and secure the bottom with stakes.
Put a fly line through each of the edge eyelets on the front, pull tight to create the ridge, and secure it with tent pegs or stakes.
Pros:
- Good rain runoff
- Good wind protection on one side
Cons:
- No floor
- Not the best structure for heavy rain and wind
- Only protects from the wind on one side
6. Basic lean-to tarpaulin shelter
The basic lean-to is excellent for a good night’s sleep. This tarp structure will keep the dew off you and has plenty of space for storing your gear to keep it dry in the rain.
The basic lean-to is as simple as rigging the fly line between two trees about 10 feet or 3m apart and then folding the tarp double over the line and fastening the two ends together on a 30-degree angle.
Pros:
- Fast and easy to put up
- Great wind protection from one side
Cons:
- No floor cover
7. Dining Fly with two poles
The dining fly is a common structure used in camp kitchens and dining areas to keep leaves and rain off the camp kitchen.
Run a fly line between two trees about 10 feet or 3m apart. Make it taut. Throw the tarp over the line so that half is on each side.
Place two fly lines on two tent poles. Then put the two tent pole spikes in tarps center eyelets and stand them up, then weaving the fly lines on the side of the tarp, take the fly lines out on an angle to create the angle of the roof that you require.
The height of the poles will determine your ceiling height inside.
Pros:
- Good rain runoff if tight
- Lots of room for tables and chairs
- Good shelter from the sun
Cons:
- No floor
- No wind protection
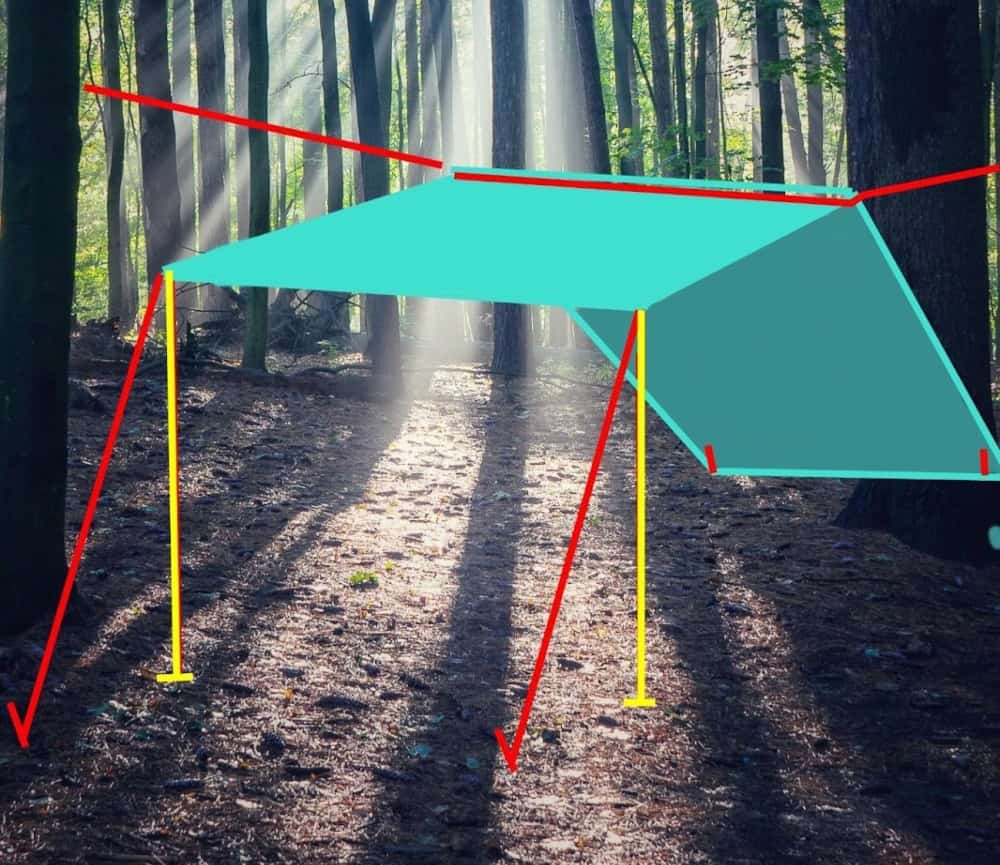
8. Flat Roof lean-to tarp shelter
The Flat Roof lean-to provides a little bit of protection from a breeze as well as giving you shade or shelter from light rain.
Tie your fly line between two trees about 10 feet or 3m apart and place a third of the tarp over it.
Pull the back of the tarp to the ground and secure it with stakes across the bottom.
Put two tent poles in the front corner eyelets and tie them off with guy ropes and tent pegs to create the roof.
Pros:
- Great rain runoff
- Good wind protection from one side
- Good rain shelter and sunshade
Cons:
- No floor
- Can sag in heavy rain

9. Flyline roof structure
Great for gathering under when you don’t have poles or don’t want the limitation of space underneath of the poles.
Thread your fly line through the eyelets of your tarp across on the diagonal to form a cross.
Then tie each end off of an appropriate tree at the height that works for your situation.
Pros:
- Quick and easy sun shelter
Cons:
- Can collect water when it rains
- Can sag easily
- No wind protection
- Needs four trees in the right place to put up
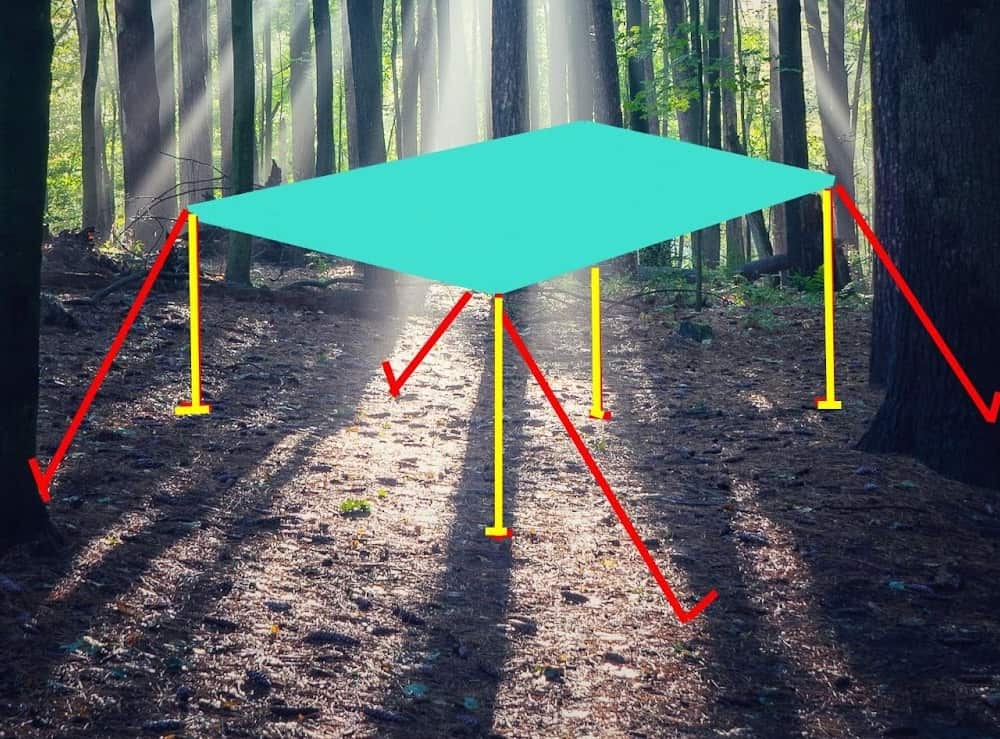
10. Fly poles shelter
The fly pole tarp tent is great for when there are no suitable trees available. It needs four poles to make it work.
Place a tent pole through the eyelets of each tarp corner and one or two guy lines, depending on how big your tarpaulin is. You may need several people to erect his tarp structure.
Once a pole is standing, Use one or two guy lines to stabilize the structure and use each corner to pull outwards to create the tension needed to keep this structure up.
Pros:
- Good protection from the sun
- Lots of room underneath
Cons:
- Only suitable for sun shelter and light rains
- Heavy rain or snow makes it sag
- Probably needs more than one person to set up
Things to consider when putting up a tarp tent
- The ground type, rocks, vegetation, trees, weather, and type of shelter you need will determine what kind of tarp tent you can construct.
- You should take the wind direction into account, or your shelter will blow away.
- Look out for nests, burrows, and animal lairs. You don’t want to set up camp on top of them.
- Watch out for dead trees or dead limbs on trees. They don’t call them widow makers for nothing!
- Don’t attach tarp lines to a single tree in a cleared area. That’s a great way to attract a lightning strike!
- The ground should be comfortable if you want to sleep under your tarp tent.
- Make sure the water collected has somewhere to run off that isn’t inside your tent.
- Build your shelter to fit its purpose and make it as large or as small as it needs to be.
- If you are expecting snow or rain, choose a structure that won’t collapse around you in the middle of the night.
- Know where the high tide mark is on a beach, and make sure you are above it.
- Ridgelines and tops of hills are too windy to set up tarp tents. Move to the leeward side to camp.
- Know your river. Know the tides, the dangerous creatures, and the likely midnight visitors…
The gear you will need to put up a tarpaulin tent successfully
A polyethylene tarp will have a lot of uses, is light, and is something you should include in your camping kit. They should be lightweight, durable, draft-proof, and waterproof. Purchase a tarp at least 10 to 12 feet (3m-3.5m) in length and 8 to 10 feet (2.5m to 3m) in width. It should be big enough to lay on top of with your sleeping bag as well as pitched over your head while you sleep.
If you’re worried about safety, get a tarp in a bright fluoro color or go for a camouflaged color or pattern that will blend in with your surroundings if you like to be unobtrusive.
Remember to bring something to prop your tarp up if you are planning on one that needs poles. You can use tent poles, hiking sticks, or even tree branches if you think you’ll find the right size/strength ones when you get there.
The best stake or tent pegs to use to hold down the tarp are Y-shaped or V-shaped stakes. They are user-friendly, durable, and light, and importantly, you can use a rock as a hammer without bending them.
You’ll want the fly lines/ropes for your ridges to be at least double the length of your tarp so that there is enough rope left to tie around the trees. Guy lines for corners can be 6-10 feet long (2-3m). It’s better to bring a bit of extra rope, just in case.
Use a rope about 1.5mm thick and has the strength to hold your tarp up even if it rains or even snows while you’re out camping.
Don’t forget to take a sketch, photo, or diagram of the tarp design with you to refer to when you go to put it up!

Taking a Tarp Backpacking
Having a tarp gives you more flexibility and allows you to carry a more lightweight backpack. Tarps are made from sturdy materials that can protect you from the environment, rain, or shine. What sets them apart from tents is that they can be customized and configured to fit your needs.
Tarps have many uses when backpacking, as a groundsheet, and are cheaper and lighter than tents in warmer weather.
They can be quicker and easier to put up and pack down than a tent. You can use a tarp to gather water to replenish your supplies and even hide your supplies while out of camp.
Advanced Tarp Structures to try
When you have mastered the A-Frame and a few of the easiest and most helpful tarpaulin structures, check out these other tarp tents and increase your knowledge and repertoire. They all have advantages and disadvantages. Find the ones that suit your terrain and camping or backpacking style.
- Bivy Bag Cornet Shelter
- Adirondack Configuration Tarp Shelter
- C-fly Wedge
- Envelope Tarp Shelter Design
- Half Box Shelter
- Hammock Shelter / Diamond Tarp Setup
- Rectangular Stall
- Tortilla
- Forrester
- Half Cone Fly
- Holden Tent
- Partial Pyramid
- Sentry Box
- Toque Tent
Getting to the tarp of the matter!
Tarps are a versatile price of camping equipment that should be part of your regular gear whether you are camping or backpacking. Practice the basic ones until you have got the hang of them, and then try some more complicated ones.
You can use tarp tents for cooking and dining areas with larger groups, or in some instances, you can drop the tent entirely and sleep closer to nature in a simple tarp structure.
Practice makes perfect, and tarps will quickly become your best friend in the outdoors!.
Happy Camping 😊
Next up: Proper tent setup requires effective use of guy lines. Check out our guide – what is a guy rope?